Showing posts with label eclectic. Show all posts

Thursday, April 10, 2014

(#TBT) Power Tools are a Girl's Best Friend

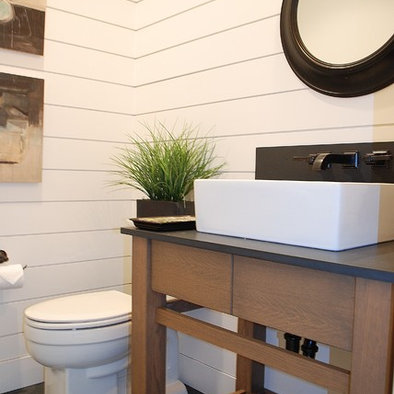
Happy Throwback Thursday! Today, we're throwing it back to my first (and only, really) interior design project. This is the basement bathroom of my parent's home. 
The room was completely DIYed, but I never broke down the projects into their own posts.
I'll be re-visiting a project or two from the room over the next few months.


The vanity has quite a story of it's own. When I began designing the bathroom, I was set on using a dining room table as the vanity. I had even chopped the table in half, and cut the hole out for the sink.


As time went on, I fell out of love with the table. I didn't feel like it was the right height or style anymore. The idea of using a dresser was born. Let's just say it took a while. About a year, maybe? I'm kinda a procrastinator, and I wasn't going to settle for anything short of perfect. 
Eventually, my mom gave me an ultimatum. If you can't find a dresser in two weeks, you have to use the table. Well, day 14 came. I'd pretty much given up hope, but decided to stop by Goodwill one last time. And there it was. In all it's [perfect height, depth, and width] glory! The price tag? $25.
AHHH! I screamed! &*$@# FINALLY! Huzzah! Take that, mother. (JK, she's pretty awesome.)


Enter the power tools. Turning a dresser into a vanity isn't too complicated.
You can see a full tutorial over at DIY Network.

It mostly involves cutting out room for the sink and plumbing parts.
Sadly, this leaves most of the drawers pretty unusable.


A few coats of polyurethane later, and much assistance in the plumbing department, it was completely installed and operational!


Be sure to subscribe for a new #TBT next week! 

♥


Sunday, June 16, 2013

For those who love change: temporary wallpaper tutorial

This is probably one of the easiest projects I have taken on!

I found these two wallpapers and fell in love! The only problem? I'm a broke-soon-to-be-college-kid!
So, I changed it into a DIY


Supplies:

  • Tissue Paper of your color choice
  • Spray Starch 
  • Paper cutter or Scissors
  • An old rag

First, decide on a pattern and Tissue Paper color 
I chose gold, from Party City, where they had a huge selection of colors


Then, I simply cut out my shapes from the tissue paper!


Spray with starch, stick on wall. Spray with starch and wipe to flatten. Simple.


(And, honestly, I didn't do the whole wall because I ran out of time :D )


To remove, peel off paper and wash wall to remove starch.
I apologize for the crappy ipod photos :)

Expenses:
Tissue paper: $1.99
Other supplies: had on hand!
Total Cost: $1.99


Monday, June 10, 2013

If I can't have a walk-in closet... (standard closet transformation!)

Welcome to my closet!

Ever since I was little, I have loved clothes. My closet, however, has always been a standard tiny one, in which I could never fit all my clothing on hangers. :( When I switched bedrooms with my sister (a year after she went off to college), my closet size increased significantly! woohoo! Sadly, that just means my former closet was teeny tiny and my current one is normal. Tis' 7ft by 2.5ft.

So, basically, I had 7 feet of hanging room, maximum if I hung the rods normally. So, I decided to hang my clothing rods along the right and left walls of the closet! This gives me 10 feet of hanging room instead, and easier access to hanging things!

You can see the rest of my bedroom here!

Before:


After:

I took the 3ft by 4ft mirror from my bathroom (from before the redo, seen here).
What is a walk-in closet if you can't change and style yourself in it? 


Along the sides of the mirror, I hung a shoe organizer. I purchased it 
at Ikea for about 5 dollars and cut it in half to fit on both sides.
A light was a necessary addition for seeing what I was picking out.
The cord (from Ikea) goes across the ceiling and down the side to an outlet. 
It is completely concealed! The shade is from Ikea, too! (Crazy, right? haha)


Cute dye coffee filter flower garland

Sadly, not everything fits in the closet. 
The remainder of my clothing resides in my little dresser.
Thanks for reading!! 

See the rest of my bedroom here!
I love comments and will always respond, so comment away!


Tuesday, January 22, 2013

DIY Whitewash Horizontal panelling!

I have long been in love with the look of horizontal panelling,
especially when painted white.

Source: www.houzz.com

I wanted to add more texture and visual interest to a very boring wall in my bathroom. 
It acts as a focal wall in the small room, without adding darker colors or separating the space with color!

I started by comparing cheap and thin wood, with emphasis on the cheap part.
The wood I settled on was $7.00 per 8x4 sheet, so the price was right!!

The store I bought the wood at is very flexible about their cutting policy and I had them rip all 3 of my sheets into 4ft by 6inch boards.

Next I primed the back of all of the boards with Kilz primer, which resists mildew and seals out more moisture than normal primer.


After this, I did two coats of the paint (same color as my walls), but instead of painting it on, I rubbed it into the wood. I wanted to preserve the wood grain look. 


Then, I nailed every piece onto the wall by the corners 
and on the studs that each board crossed. 
I used popsicle sticks for spacers. I got that idea from a 
tutorial, though I'm non sure which one. 


Woohoo ugly bathroom progress!


$21.00~Wood
$7.00~Nails
$0.00~paint (Already had!)
$0.00~Kilz (Already had!)
--------
Grand total: $28!!!

Now that's what I call a bargain! 

I am in love with the difference it makes in the room!

Before:


After:


You can see the completed bathroom here


I love comments!! Thanks for reading!!