Wednesday, March 26, 2014

Anthropologie Leather Lasse Chair Knock-Off [DIY]


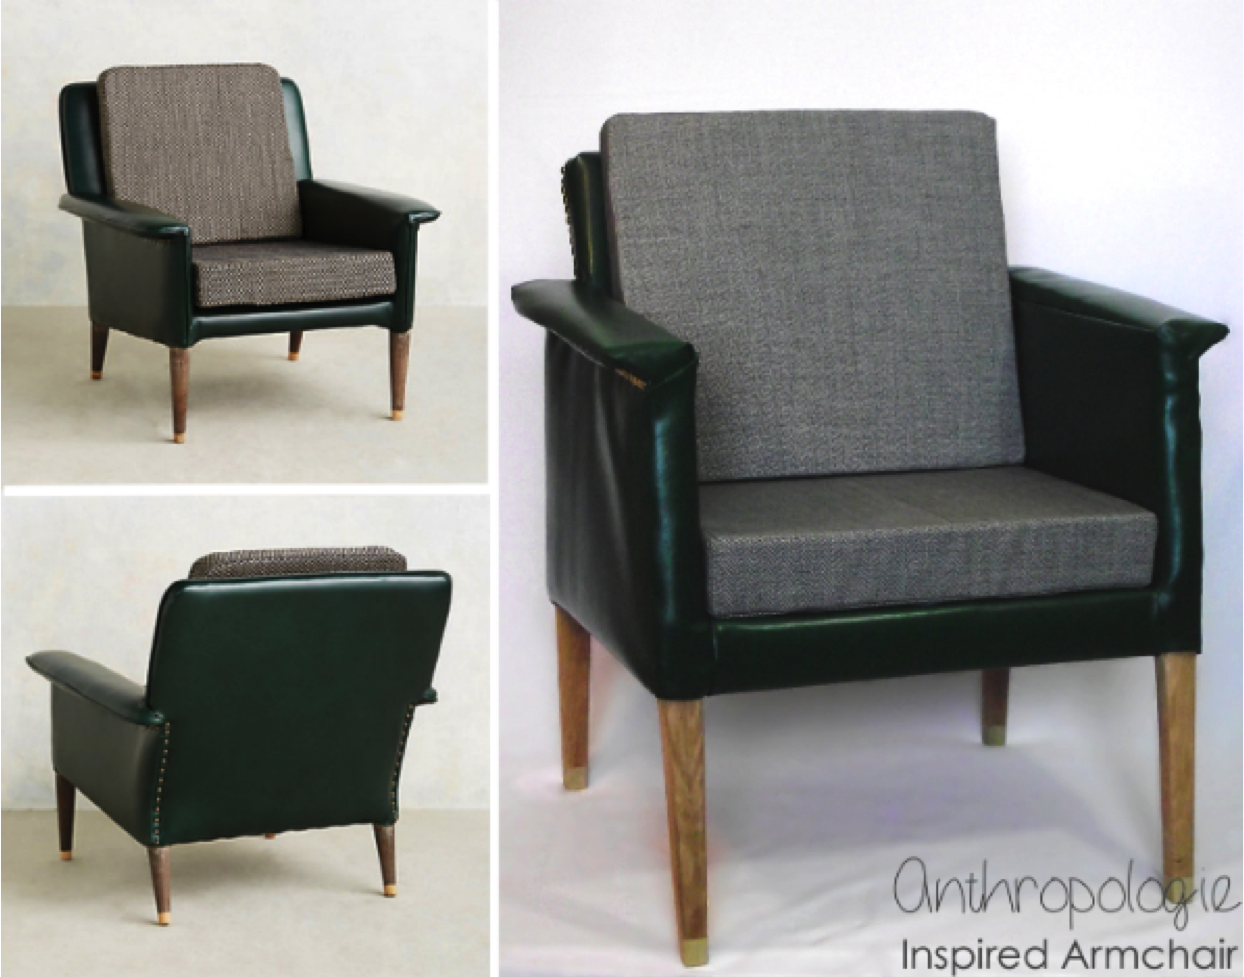
 Anthropologie is kinda the bomb. I have an unnatural obsession with browsing through their furniture. When I came across this particular chair, I fell in love! The green leather and the midcentury modern lines made my heart sing.

I stopped by my local Habitat for Humanity Restore to pick up a chair with similar lines to the original. See it tucked in at the beginning of the second row? Potential! Ugly beyond belief, but potential..
My store always has a large selection of chairs, and I picked this one up for just $2.


I took the chair from dumpster worthy, to living room ready with the help of a jigsaw, drill, and electric sander. First off, I had to change the shape of the frame. After removing both of the cushions, I tackled the legs.

First, I chopped off the part connecting the front and back legs that ran along the floor.
I also used a jigsaw to taper them.

After some quality time with my sander, the legs were completely transformed!


The back of the chair was rounded, and I needed it to be straight across. Once again to the jigsaw. The curve was cut off of the back and screwed into the front to square off that side as well. 


Last step: arms. Screw on a simple 1x4 and voila!

After that, it was ready to be upholstered. I stopped by my favorite fabric store to pick up materials. I actually did a post just on that store! Fabric for miles, people. Check it out. It's amazing.


I matched the green leather, and found black and white 
chevron fabric for the cushions.


So, once the frame was done, I covered it with batting and was ready to upholster.


Then the upholstering began. This being the second chair I've ever upholstered, I am not going to do a tutorial. I really had no clue what I was doing.


With the price of fabric and foam coming out to $82, the total was $98! That total includes $2 for the chair, $12 for upholstery tacks, and a $2 board that was used on the arms! A far cry from the original, which rings in at nearly $1,500!


Tuesday, March 25, 2014

So I got voted off the island...

Yup, it happened. Round 1 of CWTS and I've landed in the bottom 3 already.

While I am a bit disappointed, I'm really not surprised.
Did you see who I was up against?! These women are truly amazing! They are much more experienced  and skilled than I happen to be. Many have been blogging for years, some are professional designers, some are full-time bloggers, etc! And I am none of those. 

If I'm being completely honest, the more I thought about this contest after I got in, the more disappointed I was to have made it in. Now before you go all crazy on me, hear me out! Blog Puberty. Looks at projects I was doing a year ago. Two years ago. And now? 
I wish I waited until I gained more experience. 

So, overall, sorry to say it, but I am relieved beyond belief to get that weight off of my shoulders. No more thinking about only if other people will like my project. I'm doing this shit for myself! And if you like it? Awesome! And if you don't? That's totally fine! I started this blog to document my changes as an amateur designer and share my fun things with the world.

If I were to win, I don't think I'd use the title as well as other bloggers out there!

Good Luck to the rest of the bunch! I'll be playing along for fun, so stop on by!

Support the rest of the contestants over at East Coast Creative!

While you're here, check out my knock-off project!


Monday, March 17, 2014

The Three Stages of Complete and Utter Shock.


If you have no clue why I'm being so dramatic, pop on over to East Coast Creative
Because THIS just happened.


Third time's a charm! 
 My Moravian Star Light Fixture was selected as one of 12, from 299 entries, to compete in the Creating with the Stars 2014 contest. I am honored and extremely excited to be paired with the amazing Shelley [The House of Smiths], whom I have been inspired by for years.

Message to myself:
[I'm destined to become a crazy cat lady. Which is fine by me.]


Wish me luck throughout (hopefully) the next four weeks! 


Subscribe for more!

Friday, March 7, 2014

Geometric Moravian Star Light {Tutorial}


Ok. Here we go. You see this thing? You like it? Well make your own then! Here is how I did it.


I apologize for the lack of actual pictures. But think of it this way: You get to see how talented of an artist I am. ha. ha. ha. yes. It's on notebook paper.
 Like in most cases, I didn't really know what I was doing until I was done.

First off! 
Supplies
Cocktail/Coffee Straws. 
Lower (Stronger) Gauge Wire. [I used 16 gauge.]
Higher (Weaker) Gauge Wire. [I used 24 gauge.] 
Thread. [Optional. You could use wire if you desire.]
Clip. [Optional. See step 5.]
Brass Fasteners. [You'll need 17 in total.]
Hot Glue Gun.
Spray Paint. [I suggest one formulated for plastic.]
Pendant Light Thingy. [I have no clue what they're called. I think I'm close?] 
LED Lightbulb. [or any low to no heat producing bulb.]

Preparation.
First order of business, cut your straws! 
The lengths I used were about 5" and 2.5". This doesn't have to be exact, but they do have to be the same as each other. I've seen tutorials on cutting straws with a roller cutter, but this didn't work for me. So, I cut one and trimmed the rest to the same length with scissors, using the same first straw as a guide/reference.
Cut out 48 of the 2.5" straws and 68 of the 5" straws.
[If you're not in a rush, I suggest gradually stealing these from your local coffee shop. Or, if you're me, you find an enormous bag of them in your mother's car trunk. We don't ask questions.]


1.
This step, string 8 short straws onto your strong/16 gauge wire.

This will create a straw hexagon. You'll need 4 of these. 


2. 
Now, we're attaching these four hexagons to each other. Cut 8 short pieces of the thinner wire. Tie/wrap this around the intersections of the four hexagons.
Hopefully the drawings explain where they attach to each other. This going to be the frame. 
We're starting to form a geometric ball shape. 


3. 
Keep the thin wire out for this step. We'll be finishing off the frame. See how the tops create squares where they intersect? You will be making the entire ball/frame into squares. Attach all of the intersections. You will end up with 8 triangular shapes and 18 squares. The points/spikes will stick out from the squares. 


4.
Here is an easy step. Take your thread (or wire) and cut 4 strips around 14 inches long. (Basically, the length of two longer straws put room to tie them to the frame at the end. The longer, the easier.). Tie the four strings together in the middle. Now repeat this 16 times, until you have 17. One for each point.


5.
This step is tying on the points to your star. Separate out two strands of thread, and attach a clip at the knot area. [To be honest, I just used my teeth] String these two pieces of thread down one long straw segment. Take the two ends and tie them around any corner of a square on the frame. Repeat with the opposite corner, pulling relatively taught, but not enough to snap the thread. Finish off the other two corners, and VOILA! One point down! 16 to go. Sorry. This will probably take you a while.
At the end, you'll have one square without a spike in it. I recommend tying some string through the square before you put too many spikes on, so you remember not to put one there. Pick one of the squares that was created by the hexagons with stronger wire through them.


6.
Now it's time to take out your glue gun.
I used a small amount of glue on every intersection of straws. This is to eliminate any shifting, and unite the structure. The points are especially important, as you want them to be lined up nicely to look professional. 

7.
(Did I mention my horrible spelling skills? You'll need Pliers. Not Plyers. I'm ashamed.)
Pull the little legs of each fastener away from the center and chop them off with a pliers, wire cutters, pair of scissors you don't care much about, etc. Just get them off. 
8.
Take the Brass Fasteners and hot glue them to the end of the points on your star.
The ends look so much nicer covered, rather than having the straw ends showing.
9.
Spray painting time! Hang your star outside, or in a garage. 
[I know it's cold outside. Trust me. I live in Minnesota. But still, skip wearing your nice winter jacket during this step. Learn from my mistakes. ....It's actually kinda sparkly and cool now.... But don't!]
I also spray painted the top of my pendant light, which I recommend doing for aesthetics. This is taking up the visual space of another point, and uniform color makes sense.
10.
This part is kind something you need to figure out for yourself. Attaching the pendant light. My light was round, and twisted onto something, so I took a small piece of plastic, cut a round hole in it, punched holes in the corners and used wire to string it into the remaining/non spiked square.
And, you're: 


You can see more pictures over in this post

Yay Geometry!
Did you make one? Planning to make one? Questions? Tell/ask me below!

Follow on Bloglovin

Monday, March 3, 2014

Let's go shopping! On Craigslist that it. And a Designy-Life update.


Follow on Bloglovin

Good morning, lovelies! This post is brought to you by sleep deprivation and a need for entertainment.
First things first.  Some very exciting things have been happening to me lately!
Behold!!


Um, hellooo!!! What?! Super exciting for me! 


Did you see it? Check out the post here!
I always put nice comments as my computer wallpaper for a while, so thank you everybody! You may just have earned the spot! [Just like I did when Mandi Gubler visited my blog!]

 [Note the tabs I have open in this screenshot. Um, yup. I'm a geek]

On to another life update. College.
The last semester was crazy and all ended with the decision to transfer universities and switch majors. I've decided to major in Housing Studies instead of Interior Design, to eventually reach my goal of being a realtor and renovating houses & historical properties. My old university will be dearly missed, but it's all for the best. 

Oh yeah. And today, by blog views just passed 10,000! That's so crazy! Thank you, everyone!


Ok, back to Craigslist.

Whenever I have no money or space for new furniture, I turn to craigslist. Cheaper and easier than actually shopping, and less likely to result in another piece of furniture shoved in my bedroom! (Seriously. I was home this weekend and attempted to clean it? I have two headboards, a papasan chair,  two wingback type chairs, lockers, two matching nightstands waiting for a makeover, two desks, about 3 bookshelves and a crazy huge plywood thing that started it's existence as a dollhouse. Oh, and I just got rid of a couch from my old dorm room. Then there was the $20 couch from about a year ago? My mother made me get rid of that. It was vintage adorable. But she was right, I have absolutely no space for it. And that's just what is in my bedroom. I've gone through so much furniture. Have I ever mentioned how many beds I have had in my lifetime? 8. yup. (bed, other bed, bunk, loft, other bed again, other other bed, plywood things, current pickle bucket arrangement.)
My mother likes to joke that I could furnish an entire apartment by myself. And, yeah. Pretty sure I could. Whoa! Coffee induced ramblings! Let's get to this!

The first post that caught my eye. Really?! 
Okay. I'll admit it. If I saw this for $5 in Goodwill, it would painted some crazy color and sitting in my room. It's a goat! What?! 

This next one shows one of my biggest pet peeves. So, you're selling a table? Because I cannot see the table? Understand my problem with this picture?


Oh. My. Gosh.
Gorgeous. I really need a house, right now, to buy these for. And for $50? That's not bad, right!?

*drool*

I would go for these, if they weren't quite $30 per locker. I'd really sell them per unit. Plus, I have a set of four lockers sitting in my garage that I bought 2 years ago and never did anything with.
[Well? I attempted to scrape the layers of paint off with paint remover, but gave up pretty quickly.


 You have to look pretty closely to find the gem in this one. See the wicker headboard peeking out from behind the wooden one? I actually visited this store, and it was gone already. Darn it.

 Here is an interesting couch! I feel like someone could make this work in the right space. All white room with red, purple or green accents? Hmm!
 The next two are gorgeous midcentury modern pieces. I would never pay nearly $600 for a dresser, but I think the right buyer may come along for it.  
But honestly? Would anyone, rich or poor, pay $2500 for a desk? I sure hope not. This is Craigslist, people. Honestly.


And that is where I leave you! Go off and find interesting things of your own!


Follow on Bloglovin