Tuesday, February 19, 2013

First Ever Upholstery Project!

Everywhere. 

That is where you can find the infamous 1980's cane chair.
That includes both thrift stores AND blogs!


The following was the exact chair that inspired me to take on my first upholstery project, back in August of 2011. 


That's where the story of my chair began!

This is how it came to me:
(Sadly, I can't find any better pictures... sorry!)


Original button, showing ugly green color:


You never know what you will find in something from a thrift store... 
Yup, all this was stuffed in the nooks and crannies of the tiny chair!


The fun process! (in my living room, no less):


Makeover #1:


After a few coats of watermelon paint and new fabric, it was perfect for my room!
I loved it at the time, but my style has changed since then. 

New makeover coming (hopefully) tomorrow!
(This includes my entry to Creating with the Stars)

Thanks for reading! 


Tuesday, January 22, 2013

What's up next?

My bedroom!

 Even though I will be living in my house for just approximately 6 or 7 more months, I still want to do another project. It is... um... experience! Building my "design portfolio".

And just plain fun.

I have been hard at work on the room, and have installed a new floor and painted the deep purple walls to "Hushed White" (Behr). 

That's about it.

Here are the "before" pictures. Before any decorating at least. 
I know that they are not very good, but nobody reads this blog to complain anyways. 
Just don't expect any "after" pictures for 2 months or so.

Going through my door:


Door area:


Window Wall:


Wall next to window wall (door is on this wall): 


Closet and other part of far wall:
(lord only knows why the closet looks so gross)


The tapestry is the Moonbeam Tapestry from Urban Outfitters:


And the most updated picture of anything I have done...
(almost) all of my shoes fit into my closet!
Excuse the crappy quality of a phone camera.


Thanks For reading! All comments are appreciated!


DIY Whitewash Horizontal panelling!

I have long been in love with the look of horizontal panelling,
especially when painted white.

Source: www.houzz.com

I wanted to add more texture and visual interest to a very boring wall in my bathroom. 
It acts as a focal wall in the small room, without adding darker colors or separating the space with color!

I started by comparing cheap and thin wood, with emphasis on the cheap part.
The wood I settled on was $7.00 per 8x4 sheet, so the price was right!!

The store I bought the wood at is very flexible about their cutting policy and I had them rip all 3 of my sheets into 4ft by 6inch boards.

Next I primed the back of all of the boards with Kilz primer, which resists mildew and seals out more moisture than normal primer.


After this, I did two coats of the paint (same color as my walls), but instead of painting it on, I rubbed it into the wood. I wanted to preserve the wood grain look. 


Then, I nailed every piece onto the wall by the corners 
and on the studs that each board crossed. 
I used popsicle sticks for spacers. I got that idea from a 
tutorial, though I'm non sure which one. 


Woohoo ugly bathroom progress!


$21.00~Wood
$7.00~Nails
$0.00~paint (Already had!)
$0.00~Kilz (Already had!)
--------
Grand total: $28!!!

Now that's what I call a bargain! 

I am in love with the difference it makes in the room!

Before:


After:


You can see the completed bathroom here


I love comments!! Thanks for reading!! 

Monday, January 21, 2013

My Bathroom Reveal!

Welcome to my basement bathroom! For a majority of my life, this room was referred to as the fish bathroom by those in my house. The walls were covered with fish wallpaper on top, a fish border in the middle, and dark blue painted waves on the bottom. Fish soap dish, fish shower curtain, fish artwork. You get the picture. Oh, and the fish lived there.
At around age 13, I took over my older sister's downstairs bedroom. Along with that move came a bathroom move! However, fish weren't my style. 4 years later, I finished off the project!
I started the process when I was 16, and finished when I was 17. (Let's just say it took a little while)
Pictures now!

Before.
[after removal of wallpaper, mirror and light fixture]
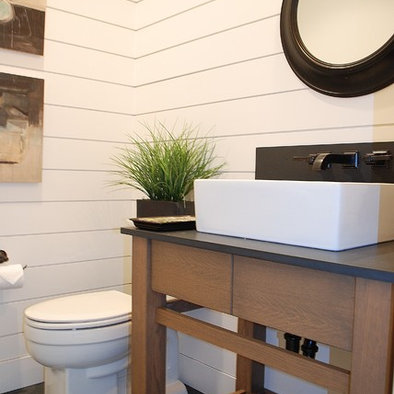
 After.

Not bad for my first interior design project?


This teeny room is choked full of DIY projects.


The "book" shelves, the vanity, the towel 
ladder, the earring holder, the floor, the panelling.


Found this in the basement of the camp I worked at last summer. 
Stealing? Psssh. No. Just long-term borrowing. 


Should have bought more of these chindi rugs when I could have. 
Snagged that one for only $3.50!


You can check out my DIY white washed paneling here


Dollar store baskets and thrifted mason jars. 
Custom built-in shelves! What a pain in the arse. But totally worth it. 


 My Lovely Favorite DIY:


The entire bathroom is basically a DIY, and on the cheap...
Pricing is as follows:
Floor: $3.00 per sq/ft (around $200)
Dresser: $25
Sink: $19
Faucet: $45
Ladder Supplies: $16
Paint: $45ish?
Panneled wall project: $35ish
Trim: $25ish
Light Fixture: $5.00
Mirror: $15.00
Mason Jars: Free+Free+$4.00
"Wildflowers": Free
Butterfly art: $4.00 +$5.00 (frame)
Toilet paper Holder: $1.00
Towel Holder: $1.00
Towel Bar (not shown): $3.00
Baskets: $3.00 (dollar store)
Built in shelves supplies: $10.00ish
Soap Dispenser: $1.00
"Book" Shelves: $10.00ish
Multi-color rug: $3.50
Everything else: Free!
Total: $477ish, including a new floor!

Sorry the pictures aren't the best! Thanks for reading!!
Comments are always appreciated!

Any tips for improved awesome-ness?


Tuesday, August 7, 2012

Well, at least it is useful?

While exploring Goodwill yesterday I stumbled upon
possibly the most interesting DIY I have encountered.

All I could think was hmmm, at least this is useful... Right?


Yup. In case you didn't realize, this is a dustpan. Made from a
liscense plate.  The moment I saw this I thought immedietly of
Mandi's {Vintage Revivals} post and had to share this!
Hope you enjoyed! 


Tuesday, June 12, 2012

For Those Who Love Color

I stumbled upon this amazing website this evening and wanted to share it!
For those who love color
vintage bound

vintage stamped

vintage flora

door hues

booked hues

vintage silver

barn tones

lit palette


Monday, June 11, 2012

Get the Look #1

Welcome to Get the Look! Since I do not have anything of my own to report today and I will be going out of town for a month, I have decided to do a mini-series. I will pick different rooms that I absolutely love and create a list of products you can buy in everyday places to get the look in your own home! First up, my favorite  bathroom I have ever stumbled upon.


Amazon.com

Sunburst Wall Mirror
Buy me here: mirror
Kohls
Buy me here: mirror
Walmart
Buy me here:ladder storage
Pottery Barn
Sears
JC Penney
Buy me here: pedestal sink
Home Depot
Walmart
Home Depot

Hope you enjoyed! This would be my bathroom if possible :D
Comment on what I should improve next time!